Shaders
Shaders can be used for replacing world textures with engineApplyShaderToWorldTexture or for drawings with drawing functions.
How HLSL Effect Files file integrate into MTA:SA
Section titled “How HLSL Effect Files file integrate into MTA:SA”This page assumes you know what an Effect File and HLSL is. If not, you better do some research first.
You can use
this shadertest resource to try the examples below.
meta.xml contains this
<meta> <script src="clientscript.lua" type="client" /> <file src="clientshader.fx" type="client" /> <file src="hurry.png" type="client" /></meta>clientscript.lua contains this:
addEventHandler("onClientResourceStart", resourceRoot, function()    myShader, tecName = dxCreateShader("clientshader.fx")    myImage = dxCreateTexture("hurry.png")    if myShader and myImage then        dxSetShaderValue(myShader, "tex0", myImage)        outputChatBox("Shader using techinque " .. tecName)    else        outputChatBox("Problem - use: debugscript 3")    endend)
addEventHandler("onClientRender", root, function()    if myShader then        dxDrawImage(200, 300, 400, 200, myShader, 0, 0, 0, tocolor(255, 255, 0))    endend)
clientshader.fx is empty.
hurry.png is copied from the race resource. i.e. race/img/hurry.png.
Copy the effect source from the code boxes into shadertest/clientshader.fx and (re)start shadertest to see the output.
After you’ve done all that, (or maybe before if glancing below is making you panic), check more shader resource examples here.
Techniques
Section titled “Techniques”Effect Files usually contain several techniques, but for simplicity, MTA will only use the first technique that will run correctly on the clients hardware. So, for any given Effect File, put your high end techniques first, and the simplest ones last. That way, players with good hardware get the best technique applied, and players with older hardware get at least something.
Simplest
Section titled “Simplest”Here is the contents of an Effect File with one technique which should work on all hardware:
//-- Declare the textures. These are set using dxSetShaderValue( shader, "Tex0", texture )texture Tex0;texture Tex1;
//-- Very simple techniquetechnique simple{    pass P0    {        //-- Set up texture stage 0        Texture[0] = Tex0;        ColorOp[0] = SelectArg1;        ColorArg1[0] = Texture;        AlphaOp[0] = SelectArg1;        AlphaArg1[0] = Texture;
        //-- Disable texture stage 1        ColorOp[1] = Disable;        AlphaOp[1] = Disable;    }}
It doesn’t use vertex or pixel shaders, only standard D3D render states. Confusing reference of all the states you can set is here: https://msdn.microsoft.com/en-us/library/bb173347%28v=VS.85%29.aspx
Not so simple
Section titled “Not so simple”Here is an Effect File containing a vertex and pixel shader:
//-- Declare the textures. These are set using dxSetShaderValue( shader, "Tex0", texture )texture Tex0;texture Tex1;
//-- Declare a user variable. This can be set using dxSetShaderValue( shader, "PositionOfCheese", 1, 2, 3 )float3 PositionOfCheese;
//-- These variables are set automatically by MTAfloat4x4 World;float4x4 View;float4x4 Projection;float4x4 WorldViewProjection;float Time;

//---------------------------------------------------------------------//-- Sampler for the main texture (needed for pixel shaders)//---------------------------------------------------------------------sampler Sampler0 = sampler_state{    Texture = (Tex0);};

//---------------------------------------------------------------------//-- Structure of data sent to the vertex shader//---------------------------------------------------------------------struct VSInput{    float3 Position : POSITION;    float4 Diffuse  : COLOR0;    float2 TexCoord : TEXCOORD0;};
//---------------------------------------------------------------------//-- Structure of data sent to the pixel shader ( from the vertex shader )//---------------------------------------------------------------------struct PSInput{  float4 Position : POSITION0;  float4 Diffuse  : COLOR0;  float2 TexCoord : TEXCOORD0;};

//-----------------------------------------------------------------------------//-- VertexShaderExample//--  1. Read from VS structure//--  2. Process//--  3. Write to PS structure//-----------------------------------------------------------------------------PSInput VertexShaderExample(VSInput VS){    PSInput PS = (PSInput)0;
    //-- Transform vertex position (You nearly always have to do something like this)    PS.Position = mul(float4(VS.Position, 1), WorldViewProjection);
    //-- Copy the color and texture coords so the pixel shader can use them    PS.Diffuse = VS.Diffuse;    PS.TexCoord = VS.TexCoord;
    return PS;}

//-----------------------------------------------------------------------------//-- PixelShaderExample//--  1. Read from PS structure//--  2. Process//--  3. Return pixel color//-----------------------------------------------------------------------------float4 PixelShaderExample(PSInput PS) : COLOR0{    //-- Modify the texture coord to make the image look all wobbly    PS.TexCoord.y += sin(PS.TexCoord.y * 100 + Time * 10) * 0.03;
    //-- Grab the pixel from the texture    float4 finalColor = tex2D(Sampler0, PS.TexCoord);
    //-- Apply color tint    finalColor = finalColor * PS.Diffuse;
    return finalColor;}

//-----------------------------------------------------------------------------//-- Techniques//-----------------------------------------------------------------------------
//--//-- MTA will try this technique first://--technique complercated{    pass P0    {        VertexShader = compile vs_2_0 VertexShaderExample();        PixelShader  = compile ps_2_0 PixelShaderExample();    }}
//--//-- And if the preceding technique will not validate on//-- the players computer, MTA will try this one://--technique simple{    pass P0    {        //-- Set up texture stage 0        Texture[0] = Tex0;        ColorOp[0] = SelectArg1;        ColorArg1[0] = Texture;        AlphaOp[0] = SelectArg1;        AlphaArg1[0] = Texture;
        //-- Disable texture stage 1        ColorOp[1] = Disable;        AlphaOp[1] = Disable;    }}
Technique ‘complercated’ will be used if the computer supports Shader Model 2, otherwise technique ‘simple’ will be used. Comments in the source explain what MTA does and where.
Points to remember when switching between editing .lua and .fx files:
- HLSL statements often end with a ; (semi-colon)
- HLSL indices start from 0 (where as Lua usually starts from 1)
- HLSL compile errors can be viewed by typing
debugscript 3into the client console
Shaders for world textures
Section titled “Shaders for world textures”Here are a couple of examples of shaders to use when replacing world textures with engineApplyShaderToWorldTexture.
Simple
Section titled “Simple”This shader just replaces the texture and allows GTA to control all the render states.
//-- Declare the texture. These are set using dxSetShaderValue( shader, "Tex0", texture )texture Tex0;
technique simple{    pass P0    {        //-- Set up texture stage 0        Texture[0] = Tex0;
        //-- Leave the rest of the states to the default settings    }}
Not so simple
Section titled “Not so simple”This shader can be used as a base for replacing a world texture if you intend to add some fancy effect. It uses mta-helper.fx to handle consistent naming of the preset shader settings (gWorld, gTexture0 etc.) mta-helper.fx also contains some helpful functions which calculate GTA lighting.
//-----------------------------------------------------------------------//-- Settings//-----------------------------------------------------------------------texture Tex0;   //-- Replacement texture

//---------------------------------------------------------------------// Include some common stuff//---------------------------------------------------------------------#include "mta-helper.fx"

//-----------------------------------------------------------------------//-- Sampler for the new texture//-----------------------------------------------------------------------sampler Sampler0 = sampler_state{    Texture = (Tex0);};

//-----------------------------------------------------------------------//-- Structure of data sent to the vertex shader//-----------------------------------------------------------------------struct VSInput{    float3 Position : POSITION0;    float3 Normal : NORMAL0;    float4 Diffuse : COLOR0;    float2 TexCoord : TEXCOORD0;};
//-----------------------------------------------------------------------//-- Structure of data sent to the pixel shader ( from the vertex shader )//-----------------------------------------------------------------------struct PSInput{    float4 Position : POSITION0;    float4 Diffuse : COLOR0;    float2 TexCoord : TEXCOORD0;};

//--------------------------------------------------------------------------------------------//-- VertexShaderFunction//--  1. Read from VS structure//--  2. Process//--  3. Write to PS structure//--------------------------------------------------------------------------------------------PSInput VertexShaderFunction(VSInput VS){    PSInput PS = (PSInput)0;
    //-- Calculate screen pos of vertex    PS.Position = mul(float4(VS.Position, 1), gWorldViewProjection);
    //-- Pass through tex coord    PS.TexCoord = VS.TexCoord;
    //-- Calculate GTA lighting for buildings    PS.Diffuse = MTACalcGTABuildingDiffuse( VS.Diffuse );    //--    //-- NOTE: The above line is for GTA buildings.    //-- If you are replacing a vehicle texture, do this instead:    //--    //--      // Calculate GTA lighting for vehicles    //--      float3 WorldNormal = MTACalcWorldNormal( VS.Normal );    //--      PS.Diffuse = MTACalcGTAVehicleDiffuse( WorldNormal, VS.Diffuse );
    return PS;}

//--------------------------------------------------------------------------------------------//-- PixelShaderFunction//--  1. Read from PS structure//--  2. Process//--  3. Return pixel color//--------------------------------------------------------------------------------------------float4 PixelShaderFunction(PSInput PS) : COLOR0{    //-- Get texture pixel    float4 texel = tex2D(Sampler0, PS.TexCoord);
    //-- Apply diffuse lighting    float4 finalColor = texel * PS.Diffuse;
    return finalColor;}

//--------------------------------------------------------------------------------------------//-- Techniques//--------------------------------------------------------------------------------------------technique tec{    pass P0    {        VertexShader = compile vs_2_0 VertexShaderFunction();        PixelShader = compile ps_2_0 PixelShaderFunction();    }}
//-- Fallbacktechnique fallback{    pass P0    {        //-- Replace texture        Texture[0] = Tex0;
        //-- Leave the rest of the states to the default settings    }}
The above code as it stands will calculate the correct lighting for GTA buildings. If you are replacing a vehicle, change:
//-- Calculate GTA lighting for buildings PS.Diffuse = MTACalcGTABuildingDiffuse( VS.Diffuse );to:
//-- Calculate GTA lighting for vehicles float3 WorldNormal = MTACalcWorldNormal( VS.Normal ); PS.Diffuse = MTACalcGTAVehicleDiffuse( WorldNormal, VS.Diffuse );Multiple pass shaders
Section titled “Multiple pass shaders”To do more than one pass, add pass blocks like this:
//-- Declare the texture. These are set using dxSetShaderValue( shader, "Tex0", texture )texture Tex0;
technique simple{    pass P0    {        // First pass        Texture[0] = Tex0;    }    pass P1    {        // Second pass        SrcBlend = Add;        DestBlend = One;    }    pass P2    {        // Third pass        SrcBlend = InvDestColor;        DestBlend = InvSrcColor;    }}
MTA Shader Semantics
Section titled “MTA Shader Semantics”HLSL fields are case-insensitive
int zEnable;int FillMode;int ShadeMode;int zWriteEnable;int LastPixel;int SrcBlend;int DestBlend;int CullMode;int zFunc;int DitherEnable;int SpecularEnable;
int AlphaRef;int AlphaFunc;int AlphaBlendEnable;int AlphaTestEnable;
int FogEnable;float4 FogColor; // float4 or dwordint FogTableMode;float FogStart; // float or intfloat FogEnd; // float or intfloat FogDensity; // float or intint RangeFogEnable;
int StencilEnable;int StencilFAIL;int StencilZFail;int StencilPass;int StencilFunc;int StencilRef;int StencilMask;int StencilWriteMask;
float4 TextureFactor; // float4 or dword
int Wrap0;int Wrap1;int Wrap2;int Wrap3;int Wrap4;int Wrap5;int Wrap6;int Wrap7;int Wrap8;int Wrap9;int Wrap10;int Wrap11;int Wrap12;int Wrap13;int Wrap14;int Wrap15;
int Clipping;int Lighting;float4 Ambient; // float4 or dwordint FogVertexMode;int ColorVertex;int LocalViewer;int NormalizeNormals;int DiffuseMaterialSource;int SpecularMaterialSource;int AmbientMaterialSource;int EmissiveMaterialSource;
int VertexBlend;int ClipPlaneEnable;float PointSize; // float or intfloat PointSize_MIN; // float or intfloat PointSize_MAX; // float or intint PointSPRITEENABLE;int PointScaleEnable;float PointScale_A; // float or intfloat PointScale_B; // float or intfloat PointScale_C; // float or int
int MultisampleAntiAlias;int MultisampleMask;int PatchedGestyle;int DebugMonitorToken;int IndexedVertexBlendEnable;int ColorWriteEnable;float TweenFactor; // float or intint BlendOp;int PositionDegree;int NormalDegree;int ScissorTestEnable;int SlopeScaleDepthBias;int AntiAliasedLineEnable;
int EnableAdaptiveTessellation;int MinTessellationLevel;int MaxTessellationLevel;int AdaptiveTess_X;int AdaptiveTess_Y;int AdaptiveTess_Z;int AdaptiveTess_W;
int TwoSidedStencilMode;int CCW_StencilFail;int CCW_StencilZFail;int CCW_StencilPass;int CCW_StencilFunc;
int ColorWriteEnable1;int ColorWriteEnable2;int ColorWriteEnable3;float4 BlendFactor; // float4 or dwordint SRGBWriteEnable;int DepthBias;int SeparateAlphaBlendEnable;int SrcBlendAlpha;int DestBlendAlpha;int BlendOpAlpha;
int ColorOp;int ColorArg0;int ColorArg1;int ColorArg2;
int AlphaOp;int AlphaArg0;int AlphaArg1;int AlphaArg2;
int BumpEnvMat00;int BumpEnvMat01;int BumpEnvMat10;int BumpEnvMat11;int TexCoordIndex;int BumpEnvLScale;int BumpEnvLOffset;int TextureTransformFlags;int ResultArg;int Constant;int AddressU;int AddressV;int AddressW;float4 BorderColor; // float4 or dwordint MagFilter;int MinFilter;int MipFilter;int MipMapLODBias;int MaxMipLevel;int MaxAnisotropy;int SRGBTexture;int ElementIndex;int DMapOffset;float4 Diffuse;float4 Ambient;float4 Specular;float4 Emissive;float Power;float4x4 View;float4x4 Projection;
float4x4 Texture0;float4x4 Texture1;float4x4 Texture2;float4x4 Texture3;float4x4 Texture4;float4x4 Texture5;float4x4 Texture6;float4x4 Texture7;
float4x4 World;float4x4 World1;float4x4 World2;float4x4 World3;
int Type;float4 Diffuse;float4 Specular;float4 Ambient;float3 Position;float3 Direction;float Range;float Falloff;float Attenuation0;float Attenuation1;float Attenuation2;float Theta;float Phi;int Enable;texture Texture;int DeviceType;int AdapterOrdinal;int Caps;int Caps2;int Caps3;int PresentationIntervals;int CursorCaps;int DevCaps;int PrimitiveMiscCaps;int RasterCaps;int ZCmpCaps;int SrcBlendCaps;int DestBlendCaps;int AlphaCmpCaps;int ShadeCaps;int TextureCaps;int TextureFilterCaps;int CubeTextureFilterCaps;int VolumeTextureFilterCaps;int TextureAddressCaps;int VolumeTextureAddressCaps;int LineCaps;int MaxTextureWidth;int MaxTextureHeight;int MaxVolumeExtent;int MaxTextureRepeat;int MaxTextureAspectRatio;int MaxAnisotropy;float MaxVertexW;float GuardBandLeft;float GuardBandTop;float GuardBandRight;float GuardBandBottom;float ExtentsAdjust;int StencilCaps;int FVFCaps;int TextureOpCaps;int MaxTextureBlendStages;int MaxSimultaneousTextures;int VertexProcessingCaps;int MaxActiveLights;int MaxUserClipPlanes;int MaxVertexBlendMatrices;int MaxVertexBlendMatrixIndex;float MaxPointSize;int MaxPrimitiveCount;int MaxVertexIndex;int MaxStreams;int MaxStreamStride;int VertexShaderVersion;int MaxVertexShaderConst;int PixelShaderVersion;float PixelShader1xMaxValue;int DevCaps2;float MaxNpatchTessellationLevel;int Reserved5;int MasterAdapterOrdinal;int AdapterOrdinalInGroup;int NumberOfAdaptersInGroup;int DeclTypes;int NumSimultaneousRTs;int StretchRectFilterCaps;int VS20Caps.Caps;int VS20Caps.DynamicFlowControlDepth;int VS20Caps.NumTemps;int VS20Caps.StaticFlowControlDepth;int PS20Caps.Caps;int PS20Caps.DynamicFlowControlDepth;int PS20Caps.NumTemps;int PS20Caps.StaticFlowControlDepth;int PS20Caps.NumInstructionSlots;int VertexTextureFilterCaps;int MaxVShaderInstructionsExecuted;int MaxPShaderInstructionsExecuted;int MaxVertexShader30InstructionSlots;int MaxPixelShader30InstructionSlots;int Position;int PositionT;int Normal;int Color0;int Color1;int TexCoord0;int TexCoord1;
Shader examples
Section titled “Shader examples”Roadshine
Section titled “Roadshine”
This resource creates a light reflection effect on the ground (looks best when moving).
Download
UV Scroll
Section titled “UV Scroll”
This resource scrolls a texture from left to right. It doesn’t use vertex or pixels shaders, so it should work on all hardware.
Download
UV scripted
Section titled “UV scripted”
This resource controls a texture’s UVs using Lua. It shows that anything is possible if you can imagine it.
Download
Car paint
Section titled “Car paint”
This resource shows you how to apply a shader to the vehicle models. The shader itself is not that great, so don’t get your hopes up.
Download
This resource applies a shader to the GTA world water. The Lua script shows how to use a timer to transfer the conventional water color setting to the shader.
Download
This resource shows you how ‘bounce’ full screen effects using a render target pool. It uses the onClientHUDRender event to exclude the HUD from the effect.
Download
Block world
Section titled “Block world”
This resource makes the textures look all blocky. It also changes colors when the ‘k’ key is pressed.
Download
Texture names
Section titled “Texture names”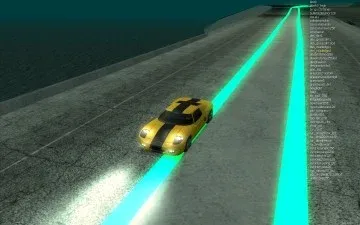
This resource is only a tool, and doesn’t do anything pretty. It shows a list of the current visible texture names, and highlights the selected texture. Ideal for finding a texture name to use with engineApplyShaderToWorldTexture.
num_8 shows/hides the texture list, num_7 and num_9 step through the list, and ‘k’ copies the current texture name to the clipboard.
Download
Skid marks
Section titled “Skid marks”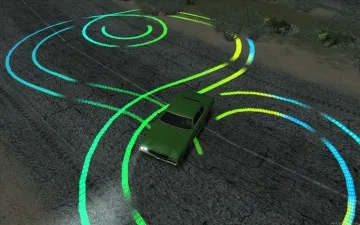
This resource shows you how to do multiple passes in a shader, and input different variables to the vertex shader for each pass. Use the command /skidmarks 1-4 to see the different effects. (You have skid a car to see it!)
Download
HDR contrast
Section titled “HDR contrast”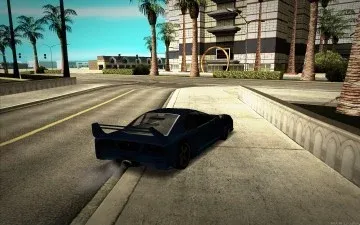
This resource applies a ‘High Dynamic Range’ contrast effect. It uses a 1 pixel render target to sample the whole scene, and then uses that to brighten or darken the next frame. So going into somewhere dark will automatically brighten the scene, and visa versa
Download
Tessellation
Section titled “Tessellation”
This resource shows how to use shader tessellation to animate the shape of a dxDrawImage and use shader transform to give it a 3rd dimension.
The example has a GUI (press numpad-8) so you can fiddle with the settings.
Download
Radial blur
Section titled “Radial blur”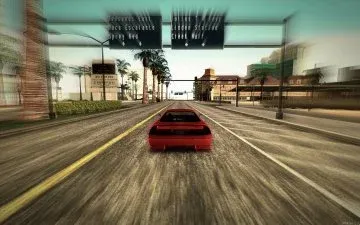
This resource sort of looks a little bit like the GTAIV motion blur you get when you move the mouse quickly, or drive a fast car. The fast car effect is a bit more subtle than the screen shot would suggest, as it leaves the center of the screen nice and clear so you can see where you are going.
Download
Detail
Section titled “Detail”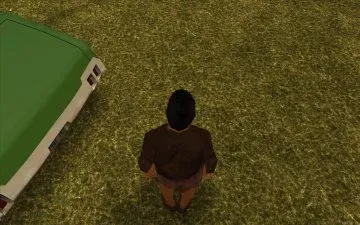
Applies a few monochrome detail textures, at various scales, to (parts of) the world.
Download
Ped morph
Section titled “Ped morph”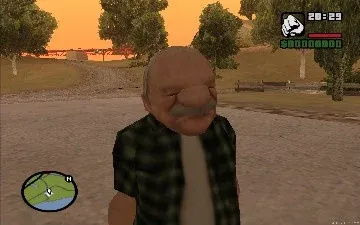
This resource uses a vertex shader to modify the geometry of a ped model as it is rendered.
When the resource has started, use the ‘k’ and ‘l’ keys to change morph size.
Download
Ped shell
Section titled “Ped shell”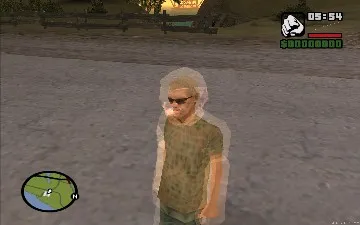
This resource draws a translucent effect as a shader layer. The first pass is done by GTA, and the vertex shader is only applied in the second to add the effect ‘on top’ of the standard output.
When the resource has started, use the ‘m’ key to see the shell effect.
Download
Hud mask
Section titled “Hud mask”
This resource shows how to draw a hud texture with a shape mask.
Download
Circle
Section titled “Circle”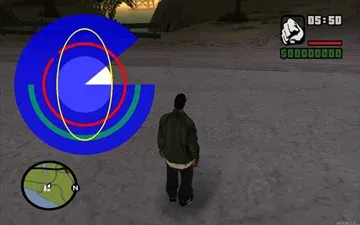
This resource exports a ‘dxDrawCircle’ function for use in your own scripts.
Example resource calling dxDrawCircle function from shader_circle: circle_example.zip
Download